
Users: adding, blocking and deleting
On this page
Add a user in Bimp under "Company settings → Users" with the "Add" button: enter the email and an access role, and after confirmation an invitation is sent to that email. Block and delete users under "User account → Users" using the "Change" button. Deleted users do not disappear from history: their documents stay under their name.
When you need this
You add users when a new employee joins the team, and you block or delete them when someone leaves, goes on vacation or a contractor’s work ends (for example, an auditor). Each user works under their own login, so all their actions are recorded in the system under their name. All articles in this section are listed on the “Users, roles and security” page.
Before you start
- Create the access roles you need: a role is assigned to a user when you invite them.
- Users can be added and changed by the account owner or a user with the “Administrator” role.
- The number of users depends on the subscription; see Subscription payment.
How to add a user
To add a user, invite them by email and assign an access role.
- Open Company settings → Users (the profile icon in the top right corner) and click Add.
- In the “Invite users” window, enter the employee’s “Email”.
- In the “Access role” field, choose a permission group, for example “Managers”.
- To invite several people at once, click New user and fill in a row for each.
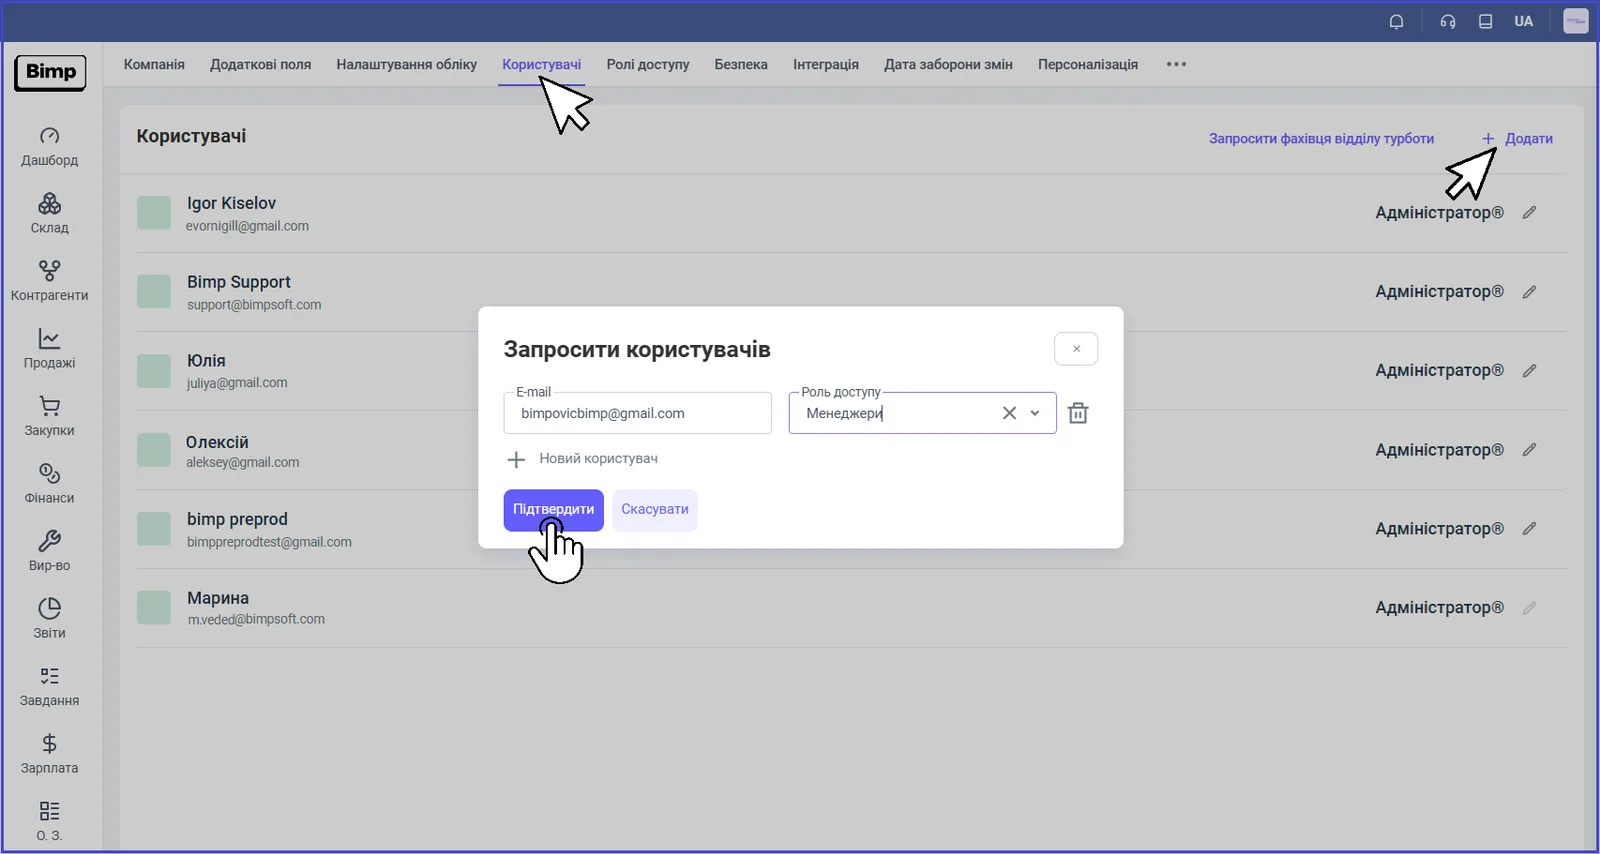
- Click Confirm.
After confirmation, an invitation email is sent to the address you entered. If the employee already has a Bimp account, they will see the invitation on the start page of their personal account. If they have no account, they are redirected to the registration page; see Sign-up and sign-in.
How to change a role or find a user
You change a role in the users list without creating a new account; the changes apply instantly. In User account → Users you can search by name or email and filter by company or role.
How to block a user
Blocking closes sign-in without deleting the account, so it suits vacations, sick leave or dismissal.
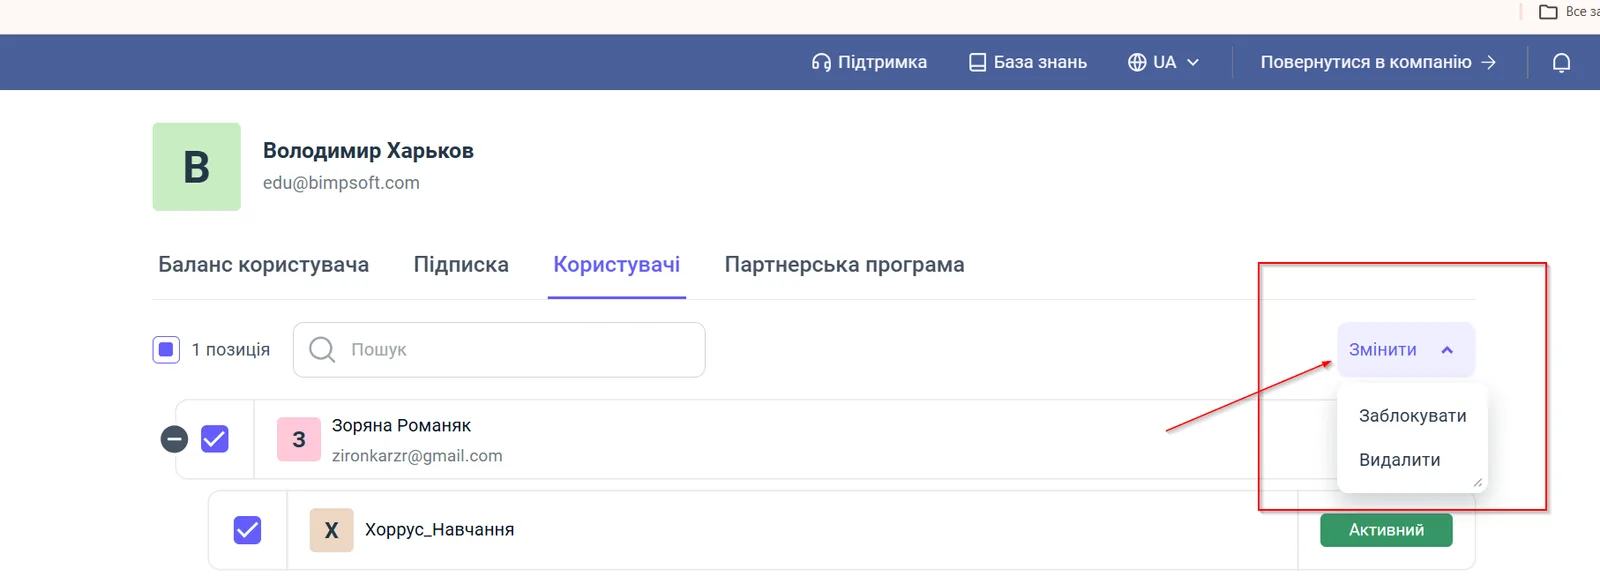
- Open User account → Users.
- Find the employee by name or email in the “Search” field.
- Tick the checkbox next to the user and the company the restriction is for.
- Click Change and choose Block. The status “Active” changes to “Blocked”.
How to delete a user
To delete a user, repeat the blocking steps and choose Delete in the “Change” button menu.
Common problems
The employee did not receive the invitation. Check the email address in the list and the “Spam” folder. If the address was entered with a mistake, delete the user and add them again with the correct address.
You cannot add a user: payment is required. The number of workplaces in the subscription is used up. Pay for additional workplaces following the instructions in Subscription payment.
FAQ
How do I add a new employee in Bimp?
Open "Company settings → Users", click "Add", enter the email and choose an access role, then click "Confirm". The employee receives an invitation email.
Will we lose a user's documents if we delete them?
No. The documents they created (invoices, orders) stay in the system under their name. Deleting the user itself cannot be undone, so for a vacation or sick leave it is better to block them.
What if there are not enough workplaces for a new user?
The system offers to pay for additional workplaces. Online payment opens access immediately; with an invoice, the money is usually credited within a business day.
How do I temporarily block an employee's sign-in without deleting them?
In "User account → Users", select the user and the company, click "Change" and choose "Block". The status changes from "Active" to "Blocked".