
Automatic exchange with banks: connecting Client-bank
On this page
The "Client-bank" integration lets you receive bank statements in Bimp without uploading files manually. Create an account in the "Banks/Bank accounts" directory, choose the integrator on the "Integration" tab and paste the token from the bank, then in the "Finance" section click "Client-bank" and choose the statement period.
What the Client-bank integration does
The “Client-bank” integration automatically passes the statement for a bank account to Bimp: you choose a period and get a list of transactions processed by the bank, without uploading files manually. You then use this statement to allocate payments - see Allocating bank statement transactions. To pass documents to accounting, set up the Bimp exchange with 1C.
The following banks and payment systems are available for the integration:
| Service | What you need to connect |
|---|---|
| Privatbank | a token (Autotoken); beforehand, create a merchant in the bank’s online account - see Connecting a PrivatBank account via API |
| Monobank | a token issued by the bank (generated through Monobank support) |
| Monopay, Fondy, Wayforpay | a token or key from the payment system |
Before you start
Prepare the token from the bank or payment system. It is also worth restricting the right to create and change integrations to users with the “Administrator” role - see Access roles.
How to create an account for the integration
- Open Directories → Banks/Bank accounts and click Create.
- Choose the currency and the account type: “Main” or “Not main”. The main account is filled in by default in the Customer payment and Supplier payment documents.
- Specify the accounting account: current account, deposit or card.
- Fill in the card number, the bank and the account number.
- Click Save.
For more on accounts, see Bank accounts and cash desks.
How to connect synchronization with the bank
Synchronization is set up on the “Integration” tab of the account card.
- Open the account you created in the Banks/Bank accounts directory and go to the “Integration” tab.
- In the “Integrator” field, choose the bank or payment system, for example Monobank.
- In the “token” field, paste the token received from the bank.
- Click Save.
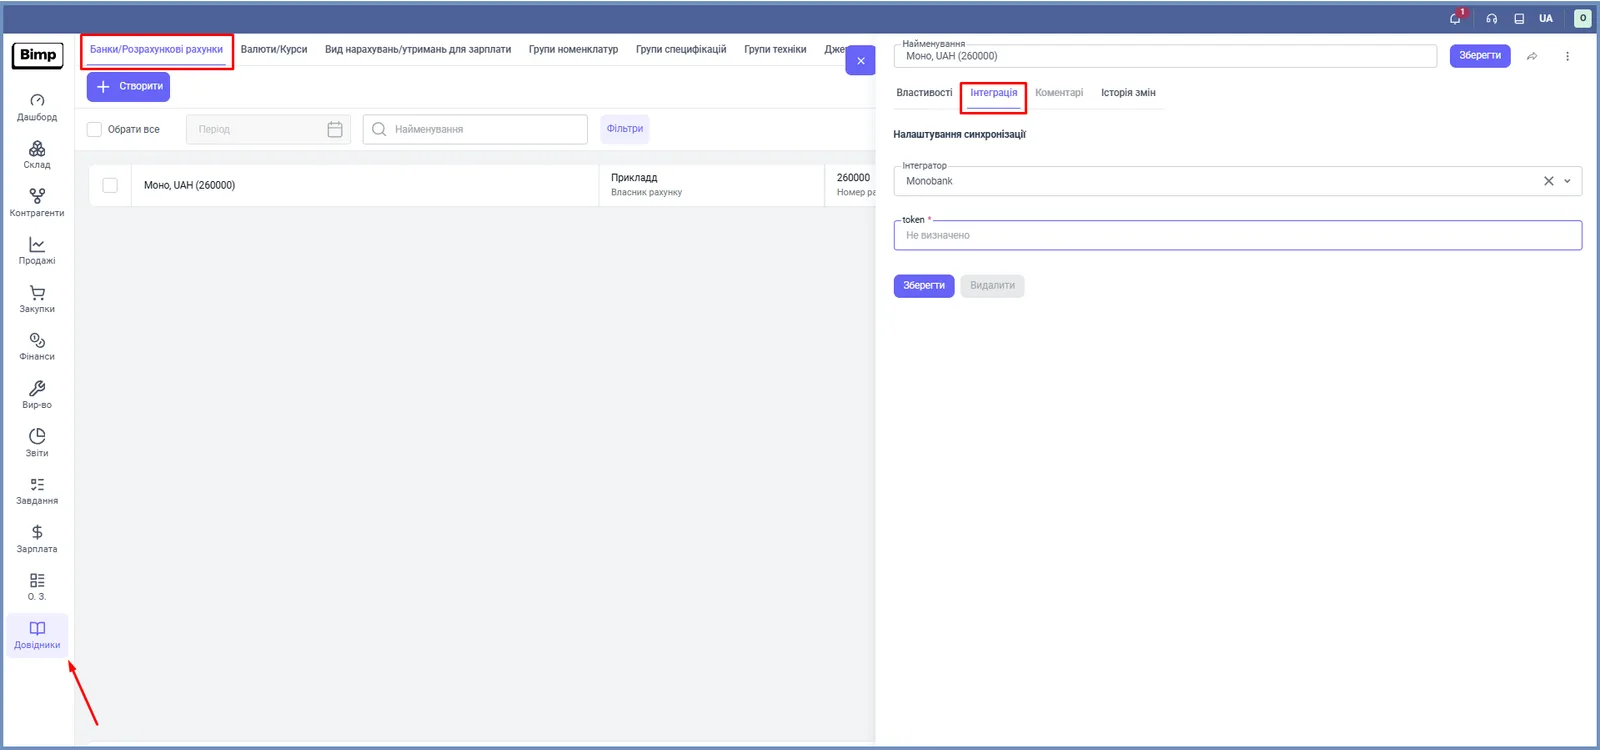
For PrivatBank, also create a merchant in the bank’s online account and paste the token the same way - see Connecting a PrivatBank account via API.
How to get a statement from the bank
- Open the Finance section and click the Client-bank button in the top right corner.
- In the “Data source” field, leave the value “From bank”. The “From file” option is for manual import - see Importing a bank statement from a file.
- Choose the “Bank account” and the “Period” for which you need the statement.
- Click Save.
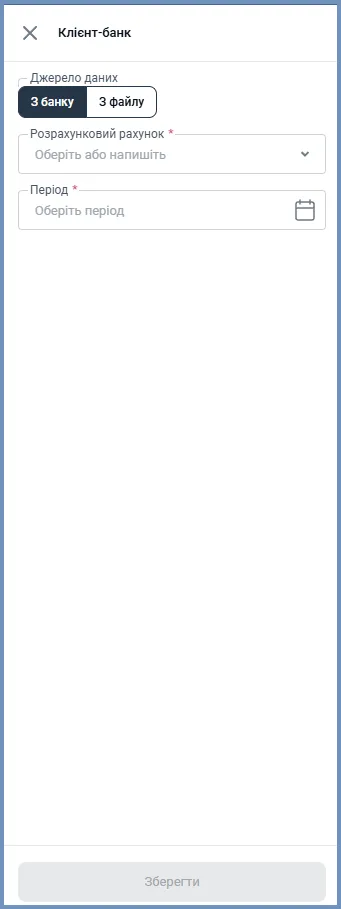
After saving, the list of processed transactions for the account becomes available in Bimp. Then allocate them to documents - see Allocating bank statement transactions.
Common problems
The account does not appear in the “Client-bank” window. Cause: the “Integration” tab is not set up for the account, or the token is not saved. Solution: open the account in the directory, check “Integrator” and “token”, and save.
The statement does not load for PrivatBank. Cause: no merchant has been created in the bank’s online account. Solution: create the merchant following the bank’s instructions and paste the token again.
FAQ
Which banks and payment systems can be connected to Bimp?
PrivatBank (Privatbank), Monobank, Monopay, Fondy and Wayforpay.
Where do I get the token for Monobank?
The token is generated on the bank's side. To get it, contact Monobank support.
What do I need to connect PrivatBank?
First create a merchant in your PrivatBank online account, then paste the token you receive into the account card in Bimp. Ask the bank's support for the merchant creation procedure.
Can I upload a statement from a file if there is no integration?
Yes. In the "Client-bank" window, switch "Data source" to "From file" - see the article on importing a bank statement from a file.