
Supplier order: how to record a purchase of goods
On this page
A supplier order in Bimp records the terms of a purchase: what, how much, at what price and when it should arrive. Create it in "Purchases → Supplier orders" with the "Create" button or from a customer order, select the supplier, contract and warehouse, add items and save. The document gets the "New" status.
When you need a supplier order
You create a supplier order when you have agreed to purchase goods, raw materials or services. The document records the terms: what, how much, at what price and by what date. It does not change the warehouse balance: the goods appear after the goods receipt. You can schedule payments for the order in the payment calendar. The whole sequence, from order to payment, is described in the purchasing process overview.
Example. An electrical equipment distributor buys a batch of LED floodlights worth 84,000 UAH from a Ukrainian factory. The manager creates an order in hryvnia, specifies the warehouse and the delivery date, and plans two payments: an advance and the balance after receipt.
Before you start
Check that you have:
- a supplier and a contract: see Adding a supplier;
- products or services in the directory: Products and services;
- a warehouse and, for cashless payment, the company’s bank account.
How to create a supplier order
There are three ways to create the document.
-
From the “Purchases” section. Open Purchases → Supplier orders and click Create.
-
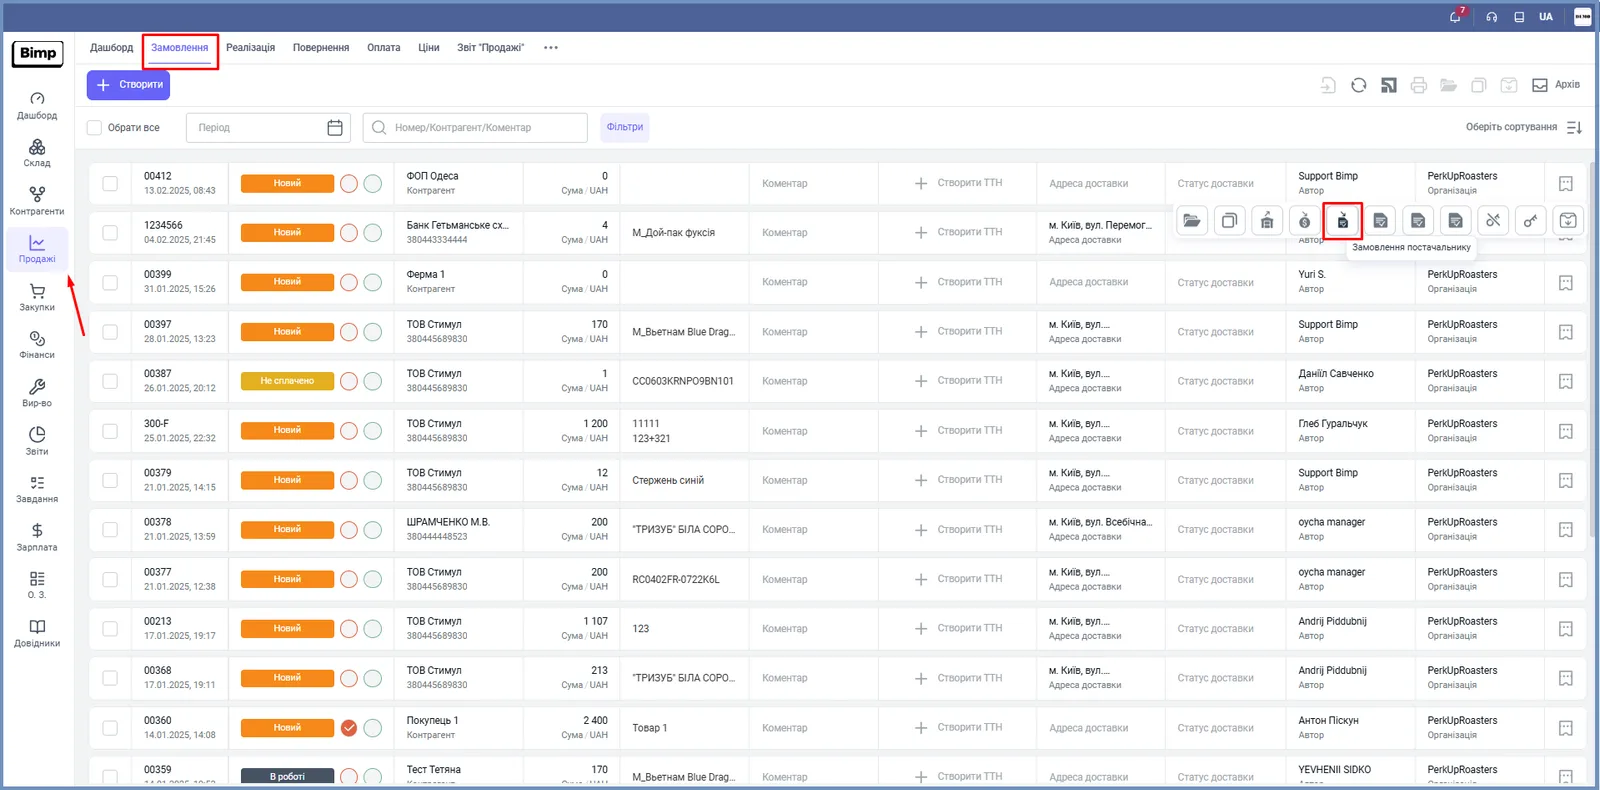
From the customer order list. In Sales → Orders, hover over the order you need and select the “Supplier order” icon.
-
From an open customer order. Click Create based on and select “Supplier order”.
With the last two methods, the contract and the customer order are filled in automatically.
How to fill in the “Main” section
The “Main” section opens first and contains the key details.
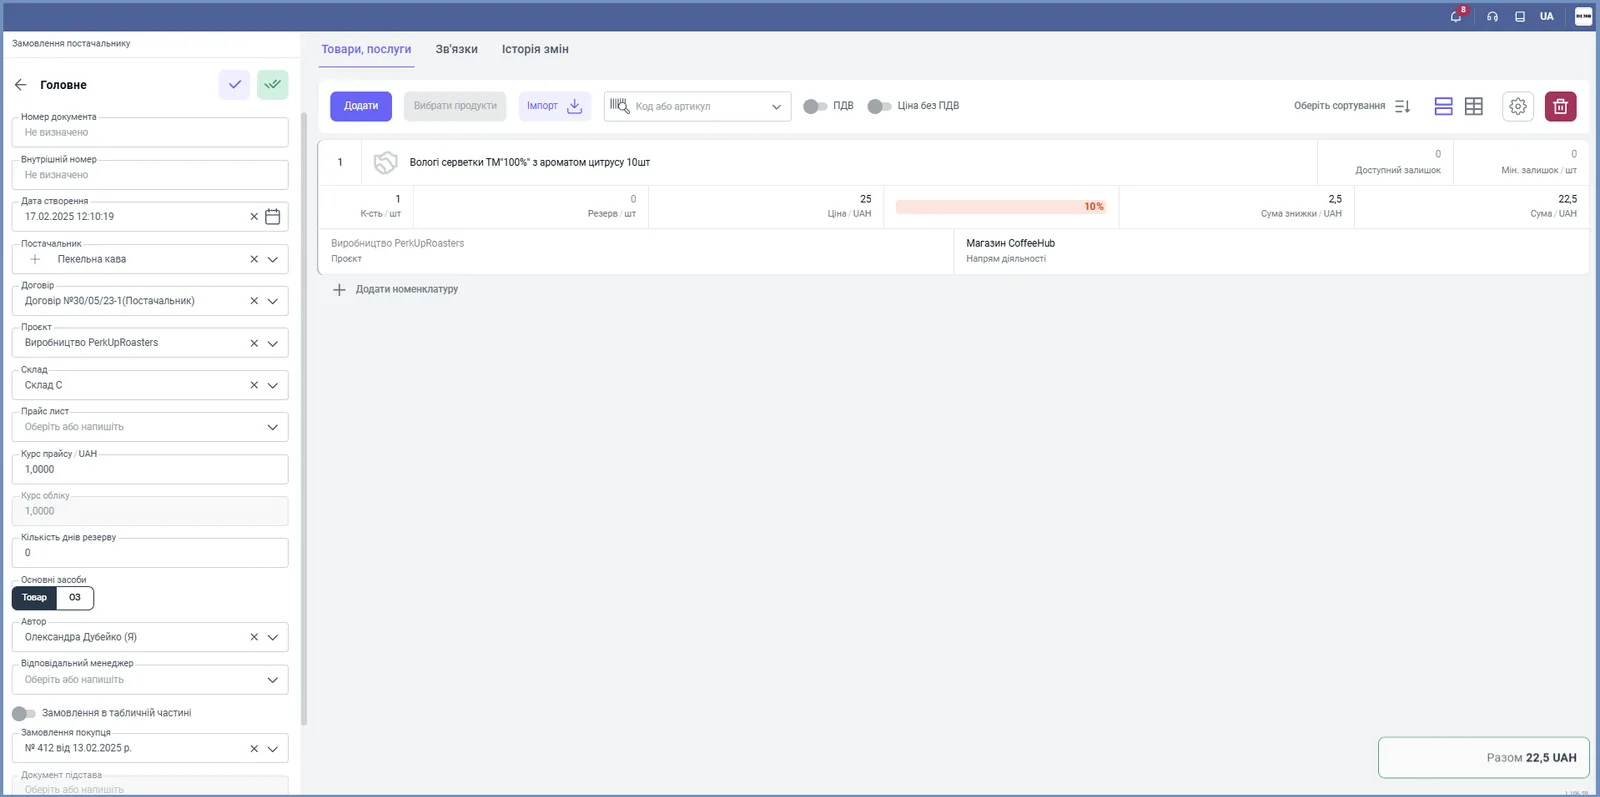
| Field | What to specify |
|---|---|
| “Document number” | assigned after saving; you can enter your own |
| “Internal number” | equals the document number by default; you can change it |
| “Creation date” | the current date; editable |
| “Supplier” | a counterparty with the “Supplier” type; if there is none, enter the name and click Create in the list |
| “Contract” | the supplier’s main contract is filled in; for an order created from a customer order, the contract of that order |
| “Organization” | the legal entity the receipt and settlements are recorded for |
| “Warehouse” | where the goods will arrive |
| “Project” | if the purchase belongs to a project; otherwise leave the value from the contract |
| “Price list” | if prices are fixed in a price list; otherwise leave empty |
| “Price list rate” | needed if the price list is in a foreign currency and payment is in hryvnia; for hryvnia, 1 |
| “Accounting rate” | the rate for calculating the management cost price |
| “Reserve days” | how many days to keep the reserve; 0 means indefinitely |
| “Goods / Fixed assets” | select Goods for a regular purchase; Fixed assets are for fixed assets |
| “Author”, “Responsible manager” | who created and who manages the purchase |
| “Shipment date” | the planned date the goods arrive in the warehouse |
How to link a purchase to a customer order
You link a purchase to a customer order so that the goods arrive straight into the reserve for that customer.
- In the “Customer order” field, select the order you are buying the goods for. For different orders in different rows, turn on the “Order in table part” switch: an “Order” column appears in the table.
- If you do not specify a customer order, the goods arrive as free balance and are not reserved.
How to set up payment
The “Payment” section defines how and when you will pay the supplier.
- Hover over the “Payment” section and click Edit.
- In “Settlement type”, select Cashless (specify the bank account) or Cash (cash desk or card).
- Tick “Add to payment calendar” to plan the expense. See Payment calendar.
- In “Deferral”, select No deferral, Full (one payment date) or Partial (several payments on different dates). The “Full” and “Partial” buttons add rows for specifying the terms.
- Save the changes.
You can select only the bank accounts and cash desks that were added to the directories. The settlement type does not restrict the actual payment method.
How to add products
You add items on the “Products, services” tab.
- Click Add and select a product in the row, or enter the code or SKU, or scan the barcode in the search field.
- If the product is not in the directory, click Create in the products list.
- Specify the quantity and price. The amount is calculated automatically, and the quantity automatically becomes the reserve.
- If needed, select the “Line of business” and “Project” for the row.
You can upload large lists from Excel with the Import button: see Uploading items from Excel. The “VAT” and “Price excl. VAT” switches above the table define whether the price already includes tax: see VAT in a supplier order.
Table columns:
| Column | What it means |
|---|---|
| “Product” | the name of the product or service |
| “Quantity” | the order volume |
| “Available balance” | how much of the product is currently in the warehouse |
| “Reserve” | the quantity reserved in this order |
| “Price” | the price per unit according to the price list or contract |
| “Discount”, “Discount amount” | the supplier’s discount as a percentage and as an amount |
| “VAT”, “VAT amount” | the tax rate and amount |
| “Amount” | the line cost including discounts and taxes |
| “Line of business”, “Project” | analytics, can differ in each row |
How to customize the document view
You can hide unnecessary columns and fields. Click the gear icon in the top right corner of the table: “Table part” controls the columns, “Section settings” controls the fields in the “Main”, “Payment” and “Other” blocks. Each section field has two switches: the left one turns the field on in quick view mode (collapsed section), the right one in full view.
What happens after saving
After saving, the order gets the “New” status; you can change it manually (“In progress”, “Confirmed” and so on). The “Other” section lets you add a “Comment” and an unlimited number of links, for example to a specification or a file on a drive. The “three dots” menu in the top left part of the document opens additional actions, including creating linked documents.
Next, you create a goods receipt and a supplier payment for the order. All documents are visible on the order’s “Links” tab.
FAQ
How do I create a supplier order from a customer order?
Open the customer order, click "Create based on" and select "Supplier order". You can also hover over the order in the list and select the "Supplier order" icon. The contract is filled in from the customer order.
Why can't I reserve goods for a customer order?
Goods cannot be reserved for a customer order created earlier than the document date. Check the chronology of the documents.
Does the settlement type affect the payment method?
No. The "Cashless" or "Cash" type is not a restriction: in practice you can pay part in cash and part cashless.
Which currency should I select for a purchase from a Ukrainian supplier?
Hryvnia. Check that the contract with the supplier specifies UAH, otherwise settlements will be made in another currency.
More about this in Bimp: Procurement in Bimp